This section describes the different steps followed to design and produce a simple “No Smoking Area” sign using Acrylic material and Spray Paint.
Step – 1 : Designing the “No Smoking Area” sign using Adobe Illustrator
In order to Laser Engrave and Cut any object, you need to have its digital design. This is to be done using any Computer Aided Design (CAD) software. In this example, the sign was designed using Adobe Illustrator.

Make sure to ask for help from professionals, as it is not just about creating a pretty sign. There are a number of things that you should keep in mind, including the message you want to communicate, the sizing/shape, the typography and the printing process.
Below is a brief guide to walk you through the design process.
- Choose Your Size & Shape : The first aspect of your design to think of is the size and shape of your sign. This mainly depends on the intended use of the sign, and where you are planning to mount it. The most common shapes for sign are regular rectangular, squared, or circular designs. Make sure to consider the limitations of the machine you will be using. Most machines have a limited size and length that they can handle.
- Choose Your Material: Typically you may have an idea about what kind of material you will use and its color. You can produce your sign using Acrylic sheets of any color and thickness. In this example we will be using White Acrylic board to produce our sign.
- Make it Bright & Colorful: No matter were you are planning to use your sign, the main purpose is to grab people’s attention. Because sign are usually viewed from quite a distance, it is advised to make your sticker design bright and colorful. This does not mean to use every color of the rainbow. One or two colors are enough to do the job.
- Choose Your Best Typography: If your sign is intended to communicate a message, it is very important to decide on the right choice of typography when designing your sign. The main goal is to make sure that the message is readable by the intended audience, and to create brand visibility. It is advised that you choose a bold and clear typeface that can be read from a distance.
- Incorporate Your Brand: If your sign represents and brand, it is important that the brand stays at the heart of your design. The main aim of a sign is to increase brand visibility, so unless your sign well represents that brand, it is going to cause an undesired impact. It is always a good idea to include your logo in the signages, as it is usually the most recognizable visual identity.
- Include a Call-To-Action: A call to action is usually a line of text or an image that prompts the recipient to take a specific course of action. This can be anything from visiting your website, following your social media profiles or give you a call. In this case we just want them to stop smoking in a certain area.
- Keep Things Simple & To-The-Point: While a lot of information might be appropriate, for signs on the other hand should be as minimalistic and simple as possible.
Step – 2: Prepare Your File For Laser Engraving & Cutting

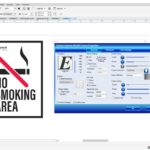
To prepare the Laser Cutting job, you should open the digital design file in a preparation software and choose the best settings that would achieve the best final result. In this example, we used Corel Draw as a preparation software.
- Import the digital design file into CorelDraw by selecting “File” > “Import” > Choose you file from location.
- Choose Your Material: Typically you may have an idea about what kind of material you will use before you laser cut. This is very important to choose the best settings required for the chosen material. Preferred settings for different material can be found in the Machine’s Catalogue. Best settings are usually chosen based on experience and previous tests done. In this example we will be using 3mm White Acrylic.
- Select the outline as “Hair Line”: We select “hair line” for the lines that we want to be cut, in our case the outline circles, and we select “ none “ for the objects that we want to engrave.
- Choose Job Type: “Combined” was selected, as we are both engraving and cutting in this example.
- Choose Your Cutting Parameters: The next step is then deciding on the different parameters for engraving (Raster Settings) and cutting (Vector Settings). We have to choose the best settings we need to have the best result. There are different variables that affect the final product coming out of the Laser Cutter. Among those variables are the Power, Speed, and DPI. In this example the following settings were used:
- Raster Settings: Speed: 80%, Power: 34%
- Vector Settings: Speed: 10%, Power: 100%, Frequency: 100
- Forward the Job: After choosing all the variables, send the order to the laser cutter. But before pressing Play on the Laser cutter, we have to manually set it up the printer with respect to the material we intend to use.
Step – 3: Setting Up The Laser Cutter
After preparing the file and the relative settings we need, the next step is to place the material we want in the laser cutter and set it up according to the thickness of the material.
To cut and engrave on our laser cutter, the following procedure was followed:
- Set the focus of the laser using the V shaped Gauge.
- Set the zero position of the laser on the top left corner of the Acrylic sheet.
- Turn On the Air compressor and ventilators .
Step – 4: Performing the Engraving and Cutting Job

Press the play button on the laser cutter, and voila, it starts engraving, then it cuts the signs after engraving.
Step-5: Remove Your Parts

Remove the laser parts from the cutting bed after it cools down and all the fumes are sucked out of the machine.
Step-6: Paint your parts
Additional post-processing steps are performed after engraving and cutting, mainly painting. However, due to fact that we are using 2 colors, painting is done in two stages. Make sure to perform the painting process before you remove the protective paper cover of the acrylic sheet, as it will help you have a very nice finish. Please make sure to paint in an open and well-ventilated area.
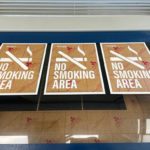
Step 6-a: Cover the red areas with paper tape and spray the rest with black spray paint

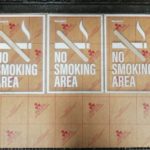
Step 6-b: Cover the black areas with paper tape and remove the tape from the red area

Step 6-c: Use red spray paint to paint the red area and remove all paper tape once the paint is dry.
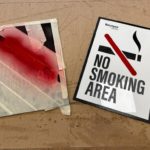
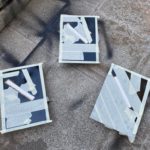
The image below shows the new signs after painting, both before and after removing the paper tape.

Step-7: Hang the signs on your intended wall.
Once all parts are clean and paint is dry, hang the sign at the dedicated area using double tape.